Saturday, March 17, 2012

Enjoy St. Patrick's Day with Chocolate Stout!

It's St. Patrick's day and it's a day to enjoy a great tasting stout.  I know what I will be drinking today.  A chocolate stout that I made to be ready for the festivities. 

With this recipe, I steeped the grains in two separate bags. This was done because I has used so many grains.  Steep the grains at 150-160°F for 30 minutes. Dried malt extract (DME) was used for this recipe and to keep the hop utilization at its best, it was added at two separate times. The first 3 lbs was added at the beginning of the boil like normal. The second was added at the last 5 minutes of the boil.  Stir in the remaining extract and kill the heat and continue as before, cooling the wort. 

After a week, rack the beer to a secondary fermenter and add the cocoa nibs directly to the beer.  If you do not have a secondary fermenter, add the cocoa nibs to the primary, being careful not to splash or come in contact with the beer.  Reseal and let it sit for another week.

To add a little bit more of a complex flavor, when I bottled, I used pale DME instead of corn sugar.  To do this, bring 2 cups of water to a boil and add the extract.  Keep it at a low boil for 15 minutes, stirring frequently to prevent boil over. ***Be warned, it will happen.  Do not walk away from this.*** Once it's cooled, continue with bottling as usual.

Enjoy St. Patrick's Day in the right style, with beer and friends. 

Sláinte!

Chocolate Stout

Recipe:

Malts:
  • 3 lbs dark DME (dry malt extract) in boil
  • 3 lbs dark DME at knockout 
  • 1 lb chocolate malts
  • 0.5 lb crystal 60L malts
  • 0.5 lbs roasted barley

BG (3 gallons): 1.052
OG (5 gallons): 1.055

Hops:
     Total IBUs: 33.
  • 0.5oz Nugget hops at 60min boil. IBUs: 22
  • 1 oz Fuggle hops at 30min boil.  IBUs: 11
Yeast:
     Wyeast Irish Ale 1084

Fermentation:
     1 week in primary fermenter at 65°F and 1 week in secondary.
     *If secondary fermenter not available, 2 weeks in primary will be fine.

Additives:
     4oz cocoa nibs to be added after primary fermentation.

Priming Sugar:
    1 & 1/4 cups pale DME extract

Saturday, December 24, 2011

Happy Holidays From Brew or Die!

It's Christmas Eve and what better way to enjoy the holidays than sharing a few beers with close friends and family.  I'm heading home to spend time with my mother and grandfather.  With me, I'm bringing a 6-pack of my recently bottled Gingerbread Nut Brown Ale.  On Christmas day, we spend time with the entire family.  If the Christmas spirit fully sets in, I might even decide to share a bottle or two. 

When I bottled, I made a point of bottling a few 22oz bottles to give as gifts.  This will be a great for friends since most of them enjoy a quality beer (some are home brewers themselves).  Before actually giving the gift, I had to make sure it wasn't ruined. I opened a bottle to check for taste and that it was fully carbonated.  Please note that when I sampled a bottle, I did so without placing it in the refrigerator because my bottles sit in an environment that makes them slightly chilled (averaging about 60°F).  I know there is a controversy over what temperature you should drink a beer.  Depending on the style, I tend to like my beers chilled below room temperature but not quite at the temperature straight from the fridge. Its a matter of preference, but a Google search produced this information which I tend to agree with.

Upon the actual pour, the color is nice and dark and formed a nice colorful head. When taking my first taste, I could smell the spices and the taste, mixed with the darker malts and brown sugar, reminded me of a gingerbread cookie.  It came out just as I hoped; malty and less bitter with a mild hop taste.  I wont lie that after trying the first bottle, I had two more.  Final verdict? A great beer for a holiday gift or just to drink for the season.  I know my friends will enjoy it and it wont last long so I'm going to hide a six pack to save and see how it tastes in a couple months.

Since we're talking beer, I think it's safe to mention the necessity of responsibility and not overdoing it.  This is something that's to be enjoyed.  You can enjoy yourself with a few beers and not become belligerent.

That being said, may your holiday be safe.  Enjoy the time you've had as the year ends and head into the new year with high hopes and a full pint.  Happy Holidays from Brew or Die!

Sunday, December 4, 2011

Gingerbread Nut Brown Ale


It has been decided. The next batch is brewed and fermenting. The final decision on style? A Gingerbread Cookie Nut Brown Ale. The plan is for a beer that is low in bitterness with a good malt flavor. This is going to turn out to be a great Christmas gift.

In researching for this recipe, I bought How to Brew by John Palmer. It's a very good book to have on hand. He explains everything very well and at the end of the book there is a breakdown of recipes. I used this as a basis for my recipe. One thing that he covers is how to use IBU's and gravity to describe and develop your beers. IBU stands for International Bitterness Unit and is a good indication of the bitterness level of a beer. Wanting the malts to come out more than that hops, I figured this to 22 IBU's, which is on the lower side. For the recipe, I wanted to use some darker malts and used some of the recommendations from the book.

Recipe is as follows:

Malts:
-6.6 lbs LME Amber extract
-8 oz Chocolate Malts
-8 oz Brown Malts
-8 oz Crystal malts 60 L

Hops:
-Bittering (60 min): 0.5 oz Nugget pellet hops
-Aroma (15 min): 0.75 oz Willamette hops

Spices: (added at the last 5 minutes of boil)
-1/4 cup brown sugar (added last 10 minutes of boil)
-2 tbsp ginger powder
-1 tbsp each cinnamon and nutmeg powder
-3/4 tbsp clove powder

Yeast:
-Wyeast 1056 American Ale Yeast

Procedure:
1 - Clean! Make sure all of your equipment has been cleaned and sterilized. Also, this is a good time to start the yeast. Since I used Wyeast this time, it come as a smack pack. Follow the instructions on how to get the yeast started and set aside till it's time to pitch.

2 - Bring 3 gallons of water up to 150-170 °F. Place the grains into a muslin bag and steep for 30 minutes. Remove and discard.

3 - Bring pot to a boil and stir in the malt extract. It would be a good idea to move the pot from the burner to prevent scorching. After the extracts are completely dissolved, return to a boil. Add the Nugget hops and start a timer for 60 minutes. Be sure to stir often to prevent a boil over (I set a timer for 5 minutes and stir at each interval). When there is 15 minutes remaining, add the Willamette hops. Add the brown sugar at 10 minute and then the spices at 5 minutes.

4 - Cool the wort using your preferred method. As seen in previous entries, I like to use ice straight into the wort. It will cool rapidly and add to the top water to bring the final volume to 5 gallons. Be sure the temperature drops below 80°F.

5 - Transfer the wort to the fermenter. I use the racking method which involves siphoning the boil from point A to point B. Once the transfer is complete, top of the fermenter to the 5 gallon mark. Aerate the wort by stirring vigorously or by shaking the bucket. Pitch the yeast and seal the fermenter. Attach the bubbler and set in a safe place to begin the fermentation process. Bottle after two weeks.

Thursday, November 24, 2011

Happy Thanksgiving! (Pumpkin Ale Tasting)

Pumpkin Ale
It's been two weeks and it's Thanksgiving. This will be a good time to share the pumpkin ale that was bottled two weeks ago. I wont be able to make it home for the holiday, but a friend and his family graciously invited me to spend the day with them. In return, I'm going to take a few over for them to try.

Before sharing, I snuck a bottle to sample. I can't be more than happy. During the pour, I found the color was on the darker side of amber and the carbonation was great. The flavor was good. Upon tasting, you get those hints of spice from the cinnamon and nutmeg. The overall body is fruitful from both the hops and the pumpkin. The pumpkin ends up a little hard to pinpoint however.It's not overly bitter, but you can taste the hops. I also took a hydrometer reading and its right at 5% alcohol. I shared a bottle with a friend at work and I received a praise. In the end, I'm happy with the outcome. I have a couple plans for a Christmas beer. More details coming soon. Until then, have a Happy Thanksgiving and enjoy the brew.

Sláinte!

Thursday, November 17, 2011

Pumpkin Ale Part II - Bottling

Fermenter after 2 weeks
It's been two weeks, the yeast has gone through their cycle in the fermenter.  It's time to bottle.  We're gonna use the bottling bucket, racking cane and tubing, bottling wand, bottle washer and at least 50 - 12 ounce bottles.  You can use larger if you have them, but I like to recycle and reuse so I've saved and collected bottles that came with a pry-off cap. You can pick up a bottle washer at any brew shop or online.  It's around a $10 investment and it's well worth it.  You can also get an adapter to attach it to a standard kitchen faucet. Bottles get pretty grimy after awhile and it really helps in the cleaning. 


To carbonate the beer, we need to add priming sugar in the wort as we bottle.  To do this, dissolve 5oz of priming sugar (aka corn sugar) in 1 cup of water and bring to a boil for 5 minutes.  Remove from the heat and let cool. While we're waiting for this to cool, clean the bottles. Give them a good rinse with hot water through the bottle washer.  If you need to, use a bottle brush to clean any residue stuck to the bottom of the bottles.  For the really troublesome ones, I boil water in my electric kettle and pour it into the suspect bottle and let it sit to break up anything that we can't get out.

We will also need to clean the bottling bucket.  If you haven't yet, it would be a good idea to sterilize first, using diluted bleach or other products.  After it has been sterilized, fill the bucket with warm water and mix with a cleaning agent.  I use Easy Clean, a no rinse cleanser made by LD Carlson.  Hook up the hose with the bottling wand and clean everything by filling the bottles with the cleaning solution (if you are using caps, toss them in the bucket with the solution and then set them aside to dry after the bucket is empty).

This is a good chance to learn how to use the bottling set up and the wand.  When the spigot is turned, the wand will fill and lock up. You'll notice that a little stopper is sticking out.  When the wand is pressed into the bottle, the stopper will release. Fill the bottles til the solution reaches the lip and remove the wand.  You'll notice the volume will drop to an appropriate level as you take it out. Let the solution sit in the bottles until ready to use.

Fermenter to bottling bucket
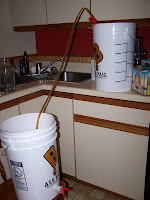
Once the bucket is empty, dump any extra cleaning solution and set on a stool or chair. Don't worry about any small bits of solution left; as long as you followed the instructions of use, it will be safe for you and the beer.  Place the fermenter on a counter or table that sets higher than the bottling bucket. The higher the original point of transfer, the smoother this will go.   Make sure the spout on the bottling bucket is closed and pour in the cooled corn sugar. Use the racking cane and hose to transfer the beer from the fermenter to the bottling bucket.  If you have a steady flow, this will mix the corn sugar during the transfer.   If you need to, tip the fermenter to get the last of the fluid to transfer.  Don't try to get every last drop because you want to keep as much sediment in the fermenter as possible.  You'll find some gunk at the bottom, just set that aside to clean.

Bottles ready to be filled
Place the bottling bucket where the fermenter was during the transfer.  I like to keep the bottles on the floor during this process for easy clean up in case they are over filled (which will happen).  Empty the bottles and line them up a row so that they will be within reach.  Hook the hose and bottling wand back up to the bucket.  Place the wand in the bottle to avoid any spilling and turn the spigot to start the flow. Fill the bottles just like we did with the cleaning solution, keeping that bit of head room at the top of the bottles. Once the bottles are filled, use the capper and seal all of the bottles. The yield should be around 48-50 bottles, give or take a few.

Keep the finished product in a cool place such as a closet or basement (as long as it's not winter).  It would be a good idea to save 6 and 12 pack cases to help with organizing.  Time for another week or two of waiting, the longer the better.  You can push it and try a beer after a week, but if it seems under carbonated, give it an additional week.

Finished product!


Sunday, November 6, 2011

Pumpkin Ale Part I - The Boil

I am happy to share that I have put my first batch of brew into the fermenter that I will be sharing with the masses. I have put together what I am hoping will be a fantastic Pumpkin Ale, ready in time to share during Thanksgiving. I cannot take all the credit however. The idea came from the lovely, Vegan Miss. We both agreed that there was no better flavor for the season than pumpkin.
My ingredients are as follows:
     
    LME Used in this boil
    
  • 8 ounces each of Carapils & Caramel 20 L crushed grains
  • 1 ounce each of Crystal and Cascade hops (I used pellets)
  • 2 - 3.3 pound jars of Amber LME (liquid malt extract)
  • 1 packet Nottingham dry active yeast
  • 1 cup brown sugar
  • 1, 3-4 pound pumpkin
  • 1 - 1½ tbsp of freshly grated cinnamon and nutmeg
  • 2 large Muslin boiling bags
  • 2, 7 lb bags of ice (you may not need both, but it's better to be safe than sorry)
*Note that this being the first post, it will be a little lengthy. Have to make sure all the necessary steps are there.

Let's start by roasting the pumpkin. Preheat your oven to 350°F. With the Halloween rush, I was unable to find a single pumpkin at the size I wanted, so I found two small ones. Start by cutting them in half and using a spoon, scrape out all the unwanted insides. Place the pumpkin halves on a baking sheet that has a layer of water. The water will keep the pumpkins from burning while they roast. Cover in foil and place in the oven for 30 minutes or until a fork softly sticks in the flesh of the pumpkins.

Use this time to prepare all of your equipment. For this step of brewing, we are going to use the fermenter and lid, the bubbler, the racking cane and the tubing. Everything needs to be sterilized. You can do this by mixing 1 to 2 tbsp of unscented bleach per 1 gallon of water. Place everything to be used in the fermenting bucket and cover with the bleach solution.

This would be a good time to check on the pumpkin. Peel the foil back, do a fork test and make sure that there is still water in the bottom of the pan. Lets get the kettle on the burner and prepare our grains. I put 3 gallons of water (I measured this using an old 1-gallon water jug) in to the kettle. Get the water heated but not boiling, the ideal temp being 155°F. It would be ideal to have a thermometer at this stage. I personally do not have one so I brought the pot up just before boil and kicked it slightly back. Place the crushed grains into one of the Muslin bags. Place the bag in the pot to steep like a big bag of tea for 30 minutes. This is another great time to check the pumpkins, they should be ready by this time. Remove them from the oven and allow them to cool.

After 30 minutes, kill the heat on the grains. If you are using an electric stove, be sure to remove the kettle from the burner. Let the grains steep for an extra 5 minutes off the heat. Remove the bag and if possible, try and to squeeze any excess water, careful not to burn yourself.

Before returning the the pot to the heat, add the malt and brown sugar. Be sure to stir to avoid the sugars from burning or sticking to the bottom. Return the pot to the heat and bring to a boil. Once boiling, it's time to add the Crystal hops. It's finally starting to smell like a real beer. Keep the wort (that's what the brew is called at this point) at a boil for an hour, stirring frequently. While this is going, the pumpkin should be cool enough to touch. Start spooning the meat of the pumpkin out into the second muslin bag.

At the last 10 minutes of of the boil, place the pumpkin in the pot. At the 2 minute mark, place Cascade hops in the boil with the spices.  Now that it has boiled for 60 minutes, remove the kettle from the heat.

Before the boil can be transferred to the fementer, we need to bring the temperature down. This is where the ice comes in, it will be used to bring the temp down and get us to the 5 gallon mark. Start by mixing the first bag in to the kettle, stirring until the ice has melted. You may not need both bags of ice for this step, but it's better to be prepared. While cooling, prepare the yeast by mixing it with warm water and let it sit for about 5 to 10 minutes. Check the temperature of the wort, the target being around 80°F.

The wort being siphoned
into the fermenter.
Syphon the wort from the kettle to the fermenter using the racking cane and tubing (for a good example of how to do this, see this page). This step will help with filtering the wort and keeping sediment in the kettle.

Now that everything is transferred to the fermenter, add any additional water to the fermenter to bring it up to 5 gallons. Add the yeast and give the whole thing a nice, vigorous stir. This will bring some oxygen into the mix and make the yeast happy. Place the lid on to seal the wort and then attach the bubbler. Now time for the waiting game. Since I only have a single fermenter, this will sit for 2 weeks before being touched.

Wednesday, November 2, 2011

Welcome to Brew or Die!

Welcome to Brew or Die! This is a new blog about the home brewing adventures of one Chicago resident. This will be my first post in a hopefully long lived blog. I'm here to share my experiences in making that delicious brew that some can't live without.  I am, by no means, a professional.  I will never claim to be.  I just want to show how easy brewing your own delicious beer actually is.  It might seem that there is a lot of time or even money to put towards this, but we will learn otherwise.

To start, you need some equipment.  You can find what you need at any brew shop, local or online.  Mine just happened to come from Midwest Supplies.  I have the basic beginners set so the only thing I needed to add was a brew kettle and bottles.   The recipes I've used or read require to steep grains in at least 2 gallons of water. I picked up a 5 gallon stock pot relatively cheap.  It doesn't have to be 5-gallons, but from what I have read, the more you can boil at one time, the better. For bottles, I just started collecting bottles from beer I've drank at home.  If you do this, you can only keep pry off bottles.

The first brew I made was an Irish Red Ale from a kit that can be found here.  I unfortunately don't have a whole lot to post about this besides that it turned out amazing.  Great color, flavor, and carbonation.  After tasting the final product, I decided to make this a frequent adventure.  The way I figure it, not only would it be fun to experiment, but also a good way to enjoy quality brew for the fraction of the cost.  I was able to get about 50 bottles out of the 5 gallons the kit produced and the kit was only $25.  What if I bought that much beer from a liquor store?  It'd be at least $75.

My intentions are to share everything I can when it comes to cost, ingredients and any other details to help in brewing the best beer possible. I would like to reach out and show others that this would be a worthwhile endeavor.

Sláinte!